OBS Engine Nano RTA Detailed Guide, Test and Review
What is OBS Engine Nano?
Visit us at Pipesarsenal Online Store
OBS Engine Nano RTA is a single coil rebuildable tank atomizer that features a top airflow design to help prevent leaking. The Engine Nano is 25 mm in diameter with a height of 40 mm from the bottom of the deck to the top of the tank. The drip tip is 10 mm making the overall height 50 mm. The liquid capacity of the engine Nano is 5.3 ml. The tank breaks down into the deck, the chamber, the glass chamber, the chimney and the drip tip. The engine nano also comes with a sheet of organic cotton, a spared glass and allen key with spare screws, a pre-built Clapton coil, spare o-rings.
OBS Engine Nano RTA is a single coil rebuildable tank atomizer that features a top airflow design to help prevent leaking. The Engine Nano is 25 mm in diameter with a height of 40 mm from the bottom of the deck to the top of the tank. The drip tip is 10 mm making the overall height 50 mm. The liquid capacity of the engine Nano is 5.3 ml. The tank breaks down into the deck, the chamber, the glass chamber, the chimney and the drip tip. The engine nano also comes with a sheet of organic cotton, a spared glass and allen key with spare screws, a pre-built Clapton coil, spare o-rings.
 |
| OBS Engine Nano RTA |
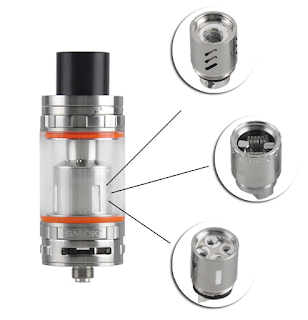
Closer look at the OBS Engine Nano
By looking at the Engine Nano up close it’s definitely
larger than the Nano name implies. There are 3 airflow holes on the top with an
adjustable airflow ring that spins freely the drip tip is a 510 drip tip that held
in place by two o-rings. The pin on the 510 connection is not adjustable and it’s
recessed quite a bit. So this is not a tank to use with a hybrid mechanical
mod. As other tanks from OBS the Engine Nano features a liquid filling slot on
the top side with a cover that pulls up the filling slot is fairly large
allowing use of a glass stripper or regular unicorn bottle to fill the tank.
The tank was a bit difficult to disassemble when I first tried opening. It was
giving me some scratches on my finger. The Chimney can be unscrewed from the
chamber and the deck. Although the profile is quite low to get a good grip of
each piece. The glass is held between the chimney and the chamber with two
o-rings to keep a tight seal. The chamber removes from the deck fairly easily
once the chimney is off.
Disassembled Tank, looking at the Deck and Chimney of Engine Nano
By looking at the deck up close you can see it has two posts
with one post hole in each post. There is a peek insulator encasing the
positive post. The post holes are fairly large and allow for most any gauge
wire to fit. This deck is designed specifically for single coil use, which is
nice compared to how many dual coil tanks are on the market. There are two
large wicking slots that feed into the area under the tank. It allows the
liquid to go directly under the tank and get pushed up into the wicks. The two
notches on the deck allow it to connect with the chimney. These notches help
align the airflow holes in the chimney with the coil. There are two airflow
holes in the chimney, one large one is for the front of the coil and a smaller
one that goes behind the coil. The inner portion of the chimney spins freely
making it easy to align the notches and assemble the tank.
 |
| Disassebled OBS Engine Nano RTA |
Building Coils on the Deck of Engine Nano Tank
Building
on the deck of the Engine Nano is very easy, the post holes are offset which
accounts for the way the leads of the coils align so the coil can sit
properly. The Clapton coil that came
with the Engine Nano which has fairly wide leads that fit easily into the post
holes. Using the allen key tighten the screw to get the coil to fit in place.
Then use a screwdriver to help align the coil. The leads are very large on this
coil and they are not easy to remove by spinning around. So they will need to
be clipped off. By giving the coil a test-fire you can see the coils start to
change color, give it a few test pulses to get it primed before wicking. Then
use a screwdriver to help align it. If the coil has some hot spots you may want
to use some ceramic tweezers to help tweak the coil a bit and get it glowing
evenly. This coil reads at about 0.2 ohms which I think is pretty low for an
RTA.
 |
| OBS Engine Nano Deck |
Making Wicks
For the wick cut a piece of the organic cotton sheet that’s
about five millimeters in width, twist up the cotton nice and tight. Then pull
the cotton through the coil finding a nice snug spot that’s not too tight or
too loose, cut the wicks leaving some extra length on each side to work your
way down. Add liquid to the wicks and let them absorb the liquid so they are
easier to work with. I like to flatten the waste with tweezers then cut off the
corners to make a pointed shape that will fit down into the wicking slots.
Filling up The Engine Nano Tank with E-Juice
I have a bunch of e-liquid sitting below the tank so I will
do some test fires to make sure the wicks are properly absorbing that liquid
and moving it up to the coil. Then place it on the rest of the tank aligning
the chimney with the deck. To fill the tank just pull up the cover on the top.
This tank holds a lot of e-juice so it takes a bit of time to fill up. When the
tank filled and ready to go I like to let it rest for just a few minutes before
using to let the wicks start soaking up the e-liquid from inside the tank.
Vaping Test of Engine Nano Tank
I tested the Engine Nano with the included Clapton coil
which read around 0.2 ohms. I tested this between 30 to 50 watts but liked it
best around 40 watts. With the Clapton coil the vapor was very warm and there
was plenty of cloud production although very little flavor. While the Clapton
Coil was nice and helped the Engine Nano perform like a dripper. It was too
warm for my liking. I changed the coil to a simple space coil that read around
0.6 ohms and used this around 30 watts which suits my preferences for tanks. I found the overall performance to be much
better to my liking. I know some people will prefer the Clapton coil and cloud
production but I like my single coil builds to be simple at a lower wattage.
The Engine Nano can handle a lower build, but I like to keep things simple.

Comments
Post a Comment